
Learn the easiest ways on how to screenshot on HP laptop, covering methods like Print Screen, Snipping Tool, Snip & Sketch, Vidmore, and Markup Hero for all Windows versions. Capturing screenshots is an essential skill for anyone using a computer. It allows you to quickly save and share images of your screen, which can be useful for various purposes such as documenting work, troubleshooting issues, or simply sharing a fun moment with friends.
How to screenshot on HP laptop analyzed
In this article, we will teach you how to screenshot on an HP laptop, covering all the latest models and Windows operating systems. We will discuss five different methods, including using the Print Screen (PrtSc) key, Snipping Tool, Snip & Sketch, Vidmore, and Markup Hero.
Using the Print Screen (PrtSc) Key
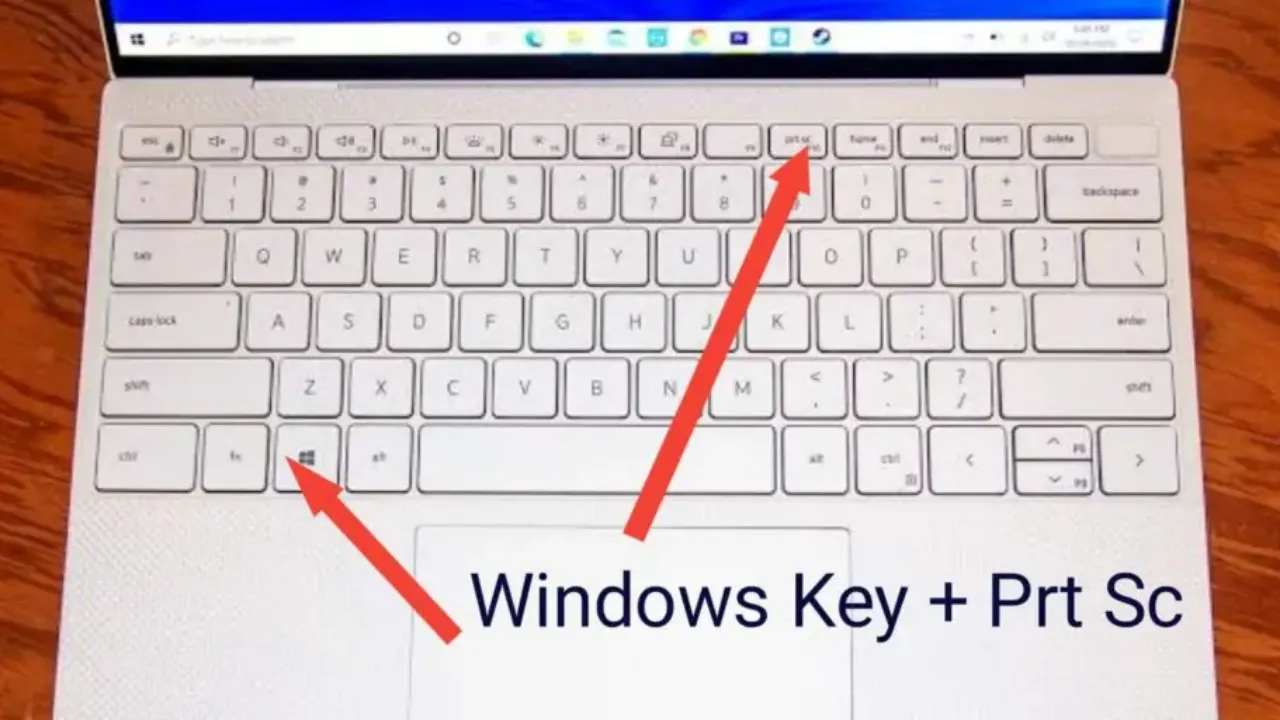
The Print Screen (PrtSc) key is a universal method for taking screenshots on most laptops, including HP models. Here’s how to use it:
- a. Locate the Print Screen (PrtSc) key: On your HP laptop, find the “PrtSc” key, which is usually located in the upper-right corner of the keyboard, near the “Delete” and “Insert” keys.
- b. Capture the entire screen: To take a screenshot of your entire screen, simply press the “PrtSc” key. This action will copy the image of your screen to the clipboard.
- c. Save the screenshot: To save the captured image, open an image editing program like Microsoft Paint or Adobe Photoshop. Press “Ctrl+V” to paste the screenshot, and then save it in your desired format and location.
- d. Capture a specific window: To screenshot only the active window, press “Alt+PrtSc.” This will copy the image of the active window to the clipboard. Follow the same steps as before to paste and save the image.
Using the Snipping Tool (Windows 7, 8, and 10 without Print Screen button)
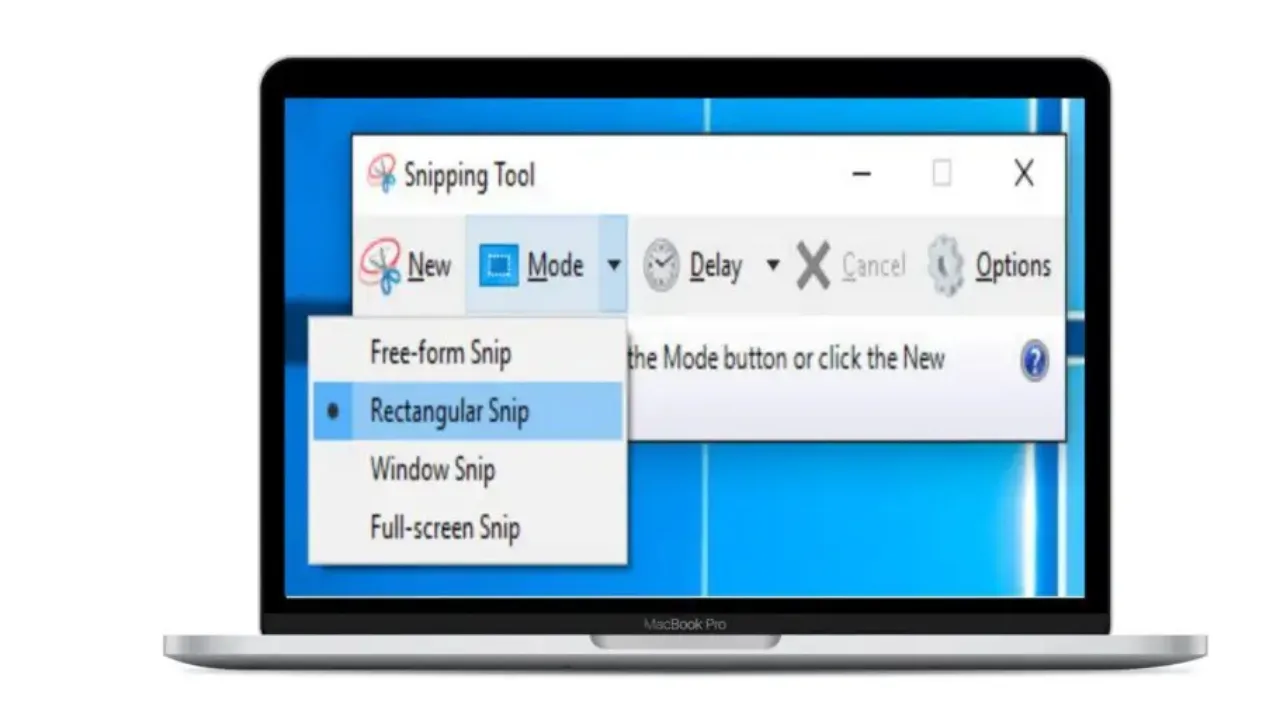
The Snipping Tool is a built-in utility for taking screenshots in Windows 7, 8, and 10. It is particularly useful for HP laptops that don’t have a Print Screen button. Follow these steps to use the Snipping Tool:
- a. Open the Snipping Tool: Press the “Windows” key, type “Snipping Tool” into the search bar, and select the application from the search results.
- b. Choose the snip shape: In the Snipping Tool window, click the “New” button to start a new screenshot. You can choose from four different snip shapes: Free-form Snip, Rectangular Snip, Window Snip, and Full-screen Snip.
- c. Capture the screenshot: Click and drag the cursor to select the area you want to capture. Release the mouse button to take the screenshot.
- d. Save and edit the screenshot: The Snipping Tool allows you to save, copy, or edit your screenshot using the built-in tools. Once you’re satisfied with your screenshot, save it in your desired format and location.
Using Snip & Sketch (Windows 10 and 11)
Another method in this our guide on how to screenshot on HP laptop is snip & Sketch. It is a screenshot utility introduced in Windows 10 and also available in Windows 11. It combines the features of the Snipping Tool with new annotation and sharing capabilities. Here’s how to use Snip & Sketch on your HP laptop:
- a. Open Snip & Sketch: Press the “Windows” key, type “Snip & Sketch” into the search bar, and select the application from the search results.
- b. Start a new screenshot: Click the “New” button in the Snip & Sketch window or press “Shift+Windows+S” to open the screenshot toolbar. Choose from Rectangular Snip, Freeform Snip, or Window Snip.
- c. Capture the screenshot: Click and drag the cursor to select the area you want to capture, or select a specific window. Release the mouse button or click on the desired window to take the screenshot.
- d. Edit and annotate the screenshot: Snip & Sketch provides built-in tools for editing and annotating your screenshot. You can add arrows, text, and various shapes to highlight important elements in the captured image.
- e. Save and share the screenshot: Once you have edited and annotated your screenshot, click the “Save” icon to save it in your desired format and location. You can also use the “Share” button to send your screenshot directly to other apps or users.
Using Vidmore
Vidmore is a third-party screen capture software that offers advanced screenshot and screen recording features. It is compatible with various HP laptop models and Windows operating systems. To use Vidmore to take screenshots, follow these steps:
- a. Download and install Vidmore: Visit the Vidmore website and download the software. Install it on your HP laptop following the on-screen instructions.
- b. Launch Vidmore: Open Vidmore from the Start menu or your desktop shortcut.
- c. Choose the screenshot mode: In the Vidmore window, select “Screen Capture” from the available options.
- d. Capture the screenshot: Click and drag the cursor to select the area you want to capture. Release the mouse button to take the screenshot. You can also choose to capture a specific window or the entire screen.
- e. Edit and save the screenshot: Vidmore provides various editing tools, such as adding text, shapes, and highlights. Once you have edited your screenshot, click the “Save” button to save it in your desired format and location.
Using Markup Hero
Markup Hero is another third-party tool that allows you to capture, annotate, and share screenshots. It is compatible with HP laptops running various Windows operating systems that is why we featured it in this our guide on how to screenshot on HP laptop.. Here’s how to use Markup Hero:
- a. Download and install Markup Hero: Visit the Markup Hero website and download the software. Install it on your HP laptop following the on-screen instructions.
- b. Launch Markup Hero: Open Markup Hero from the Start menu or your desktop shortcut.
- c. Start a new screenshot: In the Markup Hero window, click the “Capture” button or press “Ctrl+Shift+1” to start a new screenshot.
- d. Select the capture area: Click and drag the cursor to select the area you want to capture. Release the mouse button to take the screenshot. You can also choose to capture a specific window or the entire screen.
- e. Annotate and edit the screenshot: Markup Hero offers various annotation tools like arrows, text, shapes, and highlights. Edit your screenshot as needed, then click the “Save” button to save it in your desired format and location.
- f. Share the screenshot: Markup Hero provides a unique feature that allows you to generate a shareable link for your annotated screenshots. Click the “Share” button to create a link that you can share with others.
Recommended: How to clean a rubberized laptop
Conclusion
In this article, we have provided a comprehensive guide on how to screenshot on HP laptops, covering methods like the Print Screen key, Snipping Tool, Snip & Sketch, Vidmore, and Markup Hero.
By following these steps, you can easily capture and edit screenshots on your HP laptop, regardless of the model or Windows operating system. Mastering these techniques will enable you to quickly document your work, troubleshoot issues, or share fun moments with friends and colleagues. I know you have gotten all the required information on how to screenshot on HP laptop, please share to your social media pages someone might need this guide.p


1 comment